Battery switch on travel trailer function is crucial for managing your RV’s power. Understanding how these switches work – whether they’re single-pole, double-pole, or even more complex – is key to preventing dead batteries and maximizing your off-grid adventures. This guide breaks down the different types of switches, their operation, troubleshooting tips, and essential safety precautions. We’ll cover everything from basic functionality to advanced wiring diagrams, ensuring you’re confident in handling your travel trailer’s power system.
We’ll explore the various types of battery switches, detailing their pros and cons and providing a clear comparison. We’ll then walk you through safe operation, common troubleshooting steps, and preventative maintenance to keep your system running smoothly. Finally, we’ll delve into wiring diagrams and schematics to give you a complete understanding of how your battery system works.
Types of Battery Switches in Travel Trailers
Choosing the right battery switch for your travel trailer is crucial for managing your power system effectively and safely. Different types of switches offer varying levels of control and complexity, each with its own set of advantages and disadvantages. Understanding these differences will help you select the best option for your needs.
Single-Pole Battery Switches
A single-pole battery switch is the simplest type. It’s essentially an on/off switch that controls the power flow from your battery to the trailer’s electrical system. This means you can either connect the battery to the trailer’s circuits or disconnect it completely. This is a budget-friendly option, ideal for smaller trailers with simpler electrical systems. However, it lacks the ability to switch between different battery banks or isolate specific circuits.
Double-Pole Battery Switches
Double-pole switches provide more control than single-pole switches. They control both the positive and negative leads of the battery, offering improved safety by completely isolating the battery from the trailer’s electrical system when switched off. This is a significant safety advantage, reducing the risk of accidental shorts or shocks. They’re generally more expensive than single-pole switches but offer better protection.
Double-Pole Double-Throw (DPDT) Battery Switches
DPDT switches are the most advanced type commonly found in travel trailers. These switches allow you to select between two different battery sources (e.g., a main house battery and a solar panel battery) or switch between the battery and shore power. This provides maximum flexibility for managing your power sources. They’re the most expensive option but provide the greatest control and flexibility, especially beneficial for trailers with multiple battery banks or those who utilize solar power.
Comparison of Battery Switch Types
| Feature | Single-Pole | Double-Pole | Double-Pole Double-Throw (DPDT) |
|---|---|---|---|
| Number of Poles | 1 | 2 | 2 |
| Number of Throws | 1 | 1 | 2 |
| Battery Isolation | Partial (positive only) | Complete (positive and negative) | Complete (positive and negative); Selectable sources |
| Control over power sources | One battery | One battery | Multiple batteries or shore power |
| Cost | Low | Medium | High |
| Applications | Small trailers with simple electrical systems | Most trailers; prioritizes safety | Larger trailers with multiple battery banks or solar power |
Safety Precautions When Working with Battery Switches: Battery Switch On Travel Trailer Function
Working with your travel trailer’s battery system requires caution. Improper handling can lead to serious injury from electric shock, burns, or explosions. Always prioritize safety when connecting, disconnecting, or maintaining your battery switches. Understanding the potential hazards and following established safety procedures is crucial for a safe and enjoyable RV experience.
Battery switches control the flow of electricity to your trailer’s various systems. Incorrect operation can cause short circuits, damage electrical components, and even start a fire. Therefore, it’s essential to approach this task with care and a methodical approach.
Disconnecting and Connecting Batteries Safely, Battery switch on travel trailer function
The proper sequence for disconnecting and connecting batteries is critical to prevent electrical hazards. Always disconnect the negative (-) terminal first and reconnect it last. This minimizes the risk of accidental short circuits or sparks that could ignite flammable materials near the battery.
Imagine this: You’re working on your trailer’s wiring near the battery. If you disconnect the positive (+) terminal first, there’s a risk of a stray tool or wire contacting the negative terminal, creating a dangerous short circuit. By disconnecting the negative terminal first, you eliminate this risk. The same logic applies when reconnecting – connect the positive terminal last.
So, you’re prepping for a road trip? Awesome! First things first: make sure your travel trailer’s power is sorted. Check out this guide on the battery switch on travel trailer function to avoid any dead-battery surprises. Once that’s handled, you can focus on the fun stuff, like setting up your awesome audiophile travel setup – because who wants to listen to tinny music on the open road?
Get that perfect sound, and enjoy the journey!
Potential Hazards of Improper Battery Switch Usage
Several hazards are associated with improperly using battery switches. These include:
- Electric Shock: Direct contact with battery terminals or exposed wires can result in a painful and potentially dangerous electric shock.
- Burns: Batteries can generate significant heat, especially during charging or discharging. Improper handling can lead to burns from touching hot terminals or leaking battery acid.
- Explosions: Hydrogen gas is produced during the charging process. A spark near a battery emitting hydrogen can cause a dangerous explosion.
- Damage to Electrical Components: Incorrect switching can lead to short circuits, damaging sensitive electrical equipment in your trailer.
- Fires: Short circuits and sparks near flammable materials can easily ignite a fire.
Safety Guide for Working with Battery Switches
To minimize risk, follow these illustrated steps. Remember, safety glasses and gloves are essential protective gear.
Step 1: Preparation
Before starting any work, ensure the area is well-ventilated to dissipate any hydrogen gas. Wear safety glasses and gloves to protect yourself from potential splashes of battery acid or sparks. Have a fire extinguisher nearby as a precaution.
So, you’re prepping for a road trip? Awesome! First things first: make sure your travel trailer’s power is sorted. Understanding the function of your battery switch on travel trailer function is crucial for avoiding dead batteries. Once that’s handled, let’s talk tunes! For the ultimate audio experience on the road, check out this guide on creating an audiophile travel aetup – it’ll make those long drives a whole lot more enjoyable.
Get your power and your playlist ready, and hit the road!
Step 2: Disconnecting the Battery
Locate the negative (-) terminal. Using a wrench, carefully loosen and remove the negative cable clamp. Set the clamp aside, ensuring it doesn’t come into contact with any metal surfaces. Then, repeat the process for the positive (+) terminal.
Step 3: Working on the Battery Switch
Once the battery is disconnected, you can safely work on the battery switch. Remember to always double-check that the switch is off before proceeding. Carefully inspect the switch for any damage or loose connections.
Step 4: Reconnecting the Battery
When finished, reconnect the positive (+) terminal first, followed by the negative (-) terminal. Tighten the clamps securely to prevent any loose connections.
Step 5: Post-Work Inspection
After reconnecting the battery, check all connections for tightness and any signs of damage. Turn on the battery switch and test your trailer’s electrical systems to ensure everything is working correctly.
Wiring Diagrams and Schematics
Understanding wiring diagrams is crucial for safely installing and maintaining your travel trailer’s battery system. These diagrams visually represent the electrical connections, showing how components like batteries, switches, and loads are interconnected. Properly interpreting these diagrams ensures correct installation and prevents potential electrical issues.Wiring diagrams use standardized symbols to represent different components. For example, a battery is typically represented by a pair of parallel lines, longer and shorter, representing the positive and negative terminals.
A switch is often shown as a simple switch symbol, and loads (like lights or appliances) are shown as simple resistor symbols or more detailed representations depending on the complexity of the diagram. Understanding these symbols allows you to easily trace the flow of electricity through the system.
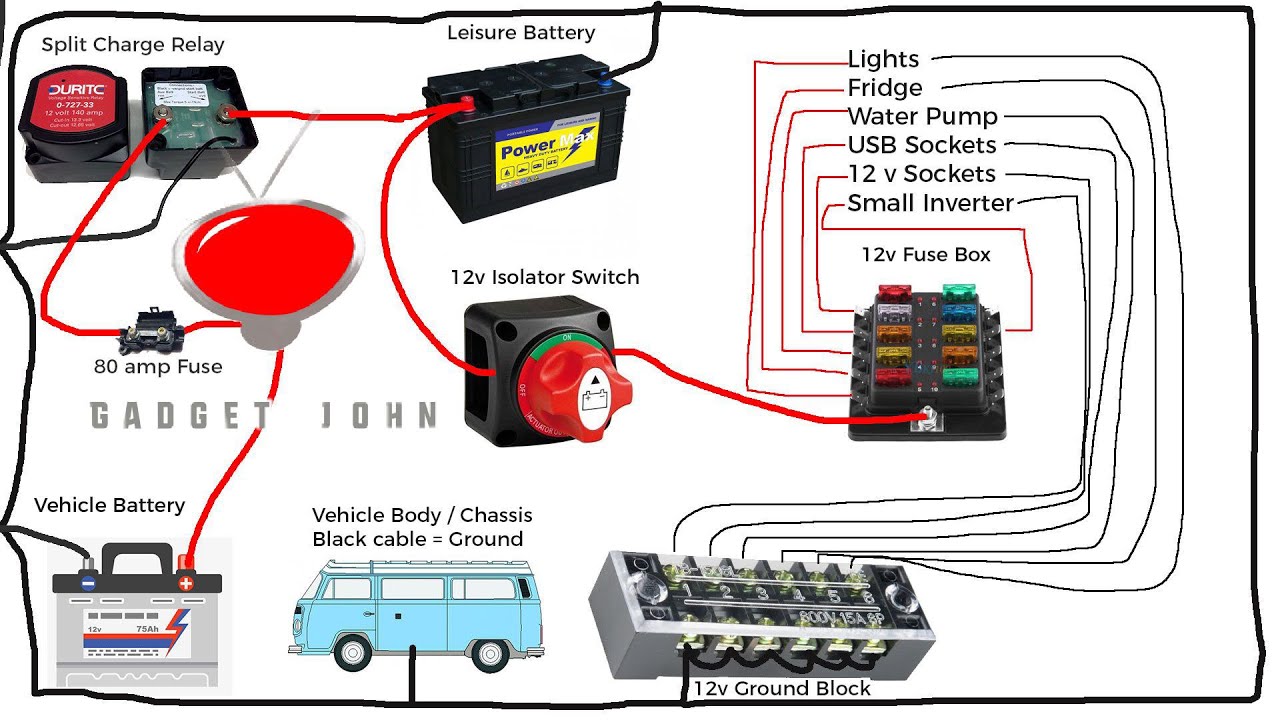
Dual Battery Setup with Battery Switch
A common setup involves two batteries, one for starting the vehicle’s engine and another for powering the trailer’s appliances. A battery switch allows you to isolate the batteries or combine them. This ensures you always have a charged starting battery and prevents accidental draining of one battery by the other.Here’s a descriptive wiring diagram for a dual battery setup with a battery switch:Imagine two batteries, labeled “Battery 1” (starting battery) and “Battery 2” (house battery).
Each battery has positive (+) and negative (-) terminals. A battery switch is placed between the two batteries. The positive terminal of Battery 1 connects to one side of the battery switch. The positive terminal of Battery 2 also connects to the other side of the switch. The output of the battery switch (the combined positive terminal) then feeds into a fuse block, protecting the wiring from overcurrent.
From the fuse block, positive power lines branch out to various loads (lights, water pump, etc.). Negative terminals of both batteries connect directly to the trailer’s chassis, creating a ground. This setup allows you to switch between using both batteries, only Battery 1, or only Battery 2, as needed. This system provides redundancy and ensures that your house battery is not drained by starting the truck.
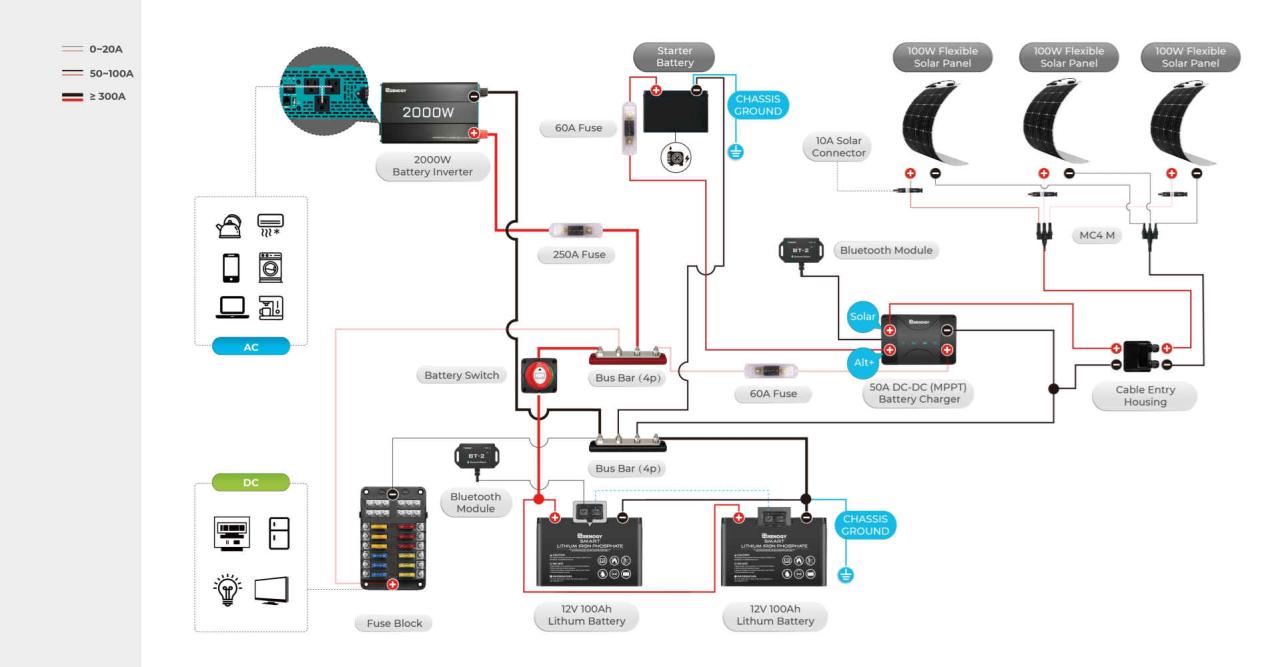
Comparison of Single and Dual Battery Systems
Single battery systems are simpler, using just one battery to power both starting and house loads. This is often sufficient for smaller trailers with lower power demands. However, it risks draining the battery completely, leaving you stranded if you run the house loads for too long without running the vehicle to recharge the battery.Dual battery systems, as described above, offer greater capacity and redundancy.
They provide independent power sources for starting and house loads. This setup is particularly beneficial for larger trailers or those with higher power consumption, as it prevents the house loads from draining the starting battery and vice-versa. The added complexity and cost are usually justified by the increased reliability and capacity they provide. The dual battery system also offers more flexibility in terms of managing power and preventing unexpected power outages.
A properly implemented dual battery system with a battery switch ensures a safer and more convenient camping experience.
Mastering your travel trailer’s battery switch is about more than just turning power on and off; it’s about understanding your RV’s electrical system and ensuring safe, reliable operation. By following the safety guidelines and maintenance procedures Artikeld in this guide, you can extend the life of your batteries and prevent costly repairs. So, take charge of your RV’s power, and enjoy the peace of mind that comes with a well-maintained system – ready for any adventure!
Helpful Answers
What happens if I accidentally leave my battery switch in the “off” position?
Leaving the switch off will completely disconnect your house batteries, preventing power to appliances and lights. Your chassis battery (for starting your tow vehicle) may remain unaffected, depending on your setup.
How often should I check my battery switch connections for corrosion?
Ideally, inspect your battery switch connections at least twice a year, or more frequently if you live in a humid climate or regularly use your travel trailer in harsh conditions.
Can I use a battery switch to charge both batteries simultaneously?
Yes, many battery switches allow you to connect both house and chassis batteries to your charging source, enabling simultaneous charging. However, always check your specific switch’s instructions.
What size wire should I use when replacing wires connected to my battery switch?
The appropriate wire gauge depends on the amperage draw of your system. Consult your RV’s wiring diagram or a qualified electrician to determine the correct gauge.
